
I’ve now done refits on four older Persson Snipes and every time I do one, I learn a bit more and the results get a little bit better. With this fourth, I thought I’d document the most recent result and what I’ve learned in order to share with others looking to do the same thing. I owned an original Persson Snipe (29147) that I bought new in 1997 which we kept for about 10 years before getting a Jibe Tech. I liked the boat a lot and my performance in the boat improved by a huge amount, maybe the apex of my Snipe career (a post for another day!). It was a pretty standardly rigged boat and I didn’t change much, so I have some good experience with the stock boat and how they work.
In many cases when these boats are later in their lifecycle, they’ve been neglected and are often on their third or fourth owner. As the boats slide down the “value scale” they often go to lesser experienced sailors, often with little Snipe experience. Nothing wrong with that and that’s how the used boat market works, but one of the consequences is people make changes to the rigging that often make no sense. This is either because they try something “weird” that they bring from other classes – often tried before on the Snipe but discarded as there are very new ideas – or something breaks and they “fix” it without really understanding what they are doing. For example the first one we bought was 29440, originally owned by Birger Jansen, but last owned by someone who tried to singlehand it and really did a number on the rigging trying to sail that way and was virtually unsailable in my opinion as it was rigged.
The subject of this post is Persson 29016 built in 1996. It was owned by some great Snipe sailors over the years, but by the time I got it had been badly neglected. It had been loaned out a number of times, every time returning in worse shape as things broke. In fact, I’ve essentially done two refits to it, or I should say one large refit in two phases. I also did most of these same changes to 29110 which was basically a stock boat that had sat for many years and in need of some TLC. I’ll mention that boat in several sections below because it is a very similar boat.
Project Boat 29016
I purchased the boat for a great price, but it needed to be completely rerigged and had a lot of cosmetic issues. What I’ve found is even if the boat is in good shape fundamentally, it will often at a minimum need to be “defunkified” and returned to the stock configuration; this was the case with 29440 that was singlehanded. That was the plan for 29016, to get it back to stock configuration and sell it as a good quality budget boat (<4$k). I paid $2000 for it and the work for the first refit (phase 1) included all new running rigging (including new hiking straps), some standing rigging upgrades (including a new whisker pole), fixing some bubbled gelcoat under bunks and a bow repair (these are typical problems with these boats which I paid someone to do this on the cheap), and swapping the kinked Proctor Miracle mast with spare old Proctor Miracle I had.


I sold it for $3800 (what I had in it, not including my labor) to someone who wanted to sail with his kids. This never materialized and I bought it back a year later. I’ve seen that movie before so one of the conditions of the sale was first right of refusal to buy it back at the original sale price. That Proctor Miracle mast broke during a charter at the windy Annapolis 2022 Women’s Nationals and the borrowed boat insurance paid for a used Sidewinder Gold. A win for everyone as the boat got a mast upgrade, the mast seller got a premium price for a used mast and the insurance company got away on the cheap with not buying a new mast! Lexi then had the boat at Sail Newport last year, but by the end of the summer, it was in need of some TLC and since we are going to keep it, I brought it home for a full refit (phase 2) based on the experience I had earlier in the year with 29110.
There are two major tasks in an update of a boat of this vintage:
- Replace mast lever and control lines with fore/aft puller lines with additional purchase. While the original levers do provide decent leverage, the stock setup doesn’t provide the leverage that is common today, after 30 years the aluminum lever/hardware are really corroded and the lever and connection to the mast gets really “sloppy” with age. By the time you clean things up and redo the purchases, it’s just as much work to retrofit the lever with lines and the contemporary puller line setup is really solid and saves some weight to boot.
- Replace fixed jib leads with floating leads. The fixed leads are the old school tracks mounted on the the deck with large ratchet blocks and cleat holders that stick as much as 6″ into the cockpit. These are the cause of many, many crew and skipper shin bruises. This is how all boats made before about 2005 were rigged and there is a reason no boats have them anymore. So this is a must do. Furthermore, the floating lead has more degrees of freedom for adjustment and is standard on all new boats.
In addition to new lines everywhere, additional tasks that need to be done are:
- Add an extra bolt to chainplates and replace the other bolts to keep them from failing, a very common problem that often results in a broken mast
- Add a forestay chainplate to simplify the jib luff wire/forestay/jib cunningham setup
- Add a daggerboard “flapper” and making sure the restraining line is class legal (this was done on phase 1, but I redid the restraining line in phase 2)
- Change to a crew lead vang, a common setup these days (a personal preference for Lexi who will continue to sail the boat)
- Move the jib halyard control back to the skipper (prior owners liked it to the crew)
- Rerig the vang with one sized larger blocks to increase the vang line diameter
- Check over the mast and boom and fix/replace any parts with issues
- Buff and polish the bottom, deck and blades

Mast Controls
After removing the lever, mounting hardware and all of the control lines, the first task is to cut a slot in the foredeck for a through deck turning block. This typically goes directly aft of the through deck fitting for the jib cunningham. On 29016, I suspected there was some water intrusion into the core for that fitting, so I made the cutout slightly farther forward to cut away that piece. I decided to use a double block through deck fitting for both. Good thing I did, because the balsa core was squishy. the trick when cutting a hole here is to grind some of the balsa core away (leaving the inner and outer skins) and fill it with thickened resin to seal the core and provide structure to bolt the fitting to. Once you do this it will last a long time and be plenty strong.


The second task is to deal with the swiss cheese in the deck behind the mast left from the lever mounting hardware and in the case of this boat several other through deck blocks I removed because they were no longer used, nor could I tell what they were ever used for! Rather than do the glasswork to fix these holes, I’ve used a piece of 1/4″ G10 plate you can buy from McMaster-Carr for about $15. It’s easy to cut and very strong. I cut a hole for the through deck fitting for the mast aft and bolted this to the plate and deck. In this case it was fairly large to cover the swiss cheese. For 29110, it was quite a bit smaller as it just had to cover the lever hole. It looks quite nice.


Third was figuring out how to run the control lines for the mast fore/aft. I wanted to have 8:1 for both. For the mast forward, it is a series of cascades: 2x above deck and two 2x cascades below deck (the first with a becket) with the forward control led to cleats behind the daggerboard ala the Jibe Tech. Many boats have that control on the deck in just behind the mast for the crew, but I think it’s better for the skipper. I again used a piece of G10 to cover some holes, provide a mounting base for cleats and provide protection for the aft end of the trunk. For the mast aft, again there is 2x above deck and below the deck, just forward of the trunk is a 4:1 that leads both sides back to the skipper, the standard spot for it. This was at least several days work between lots of head scratching and eventually implementation.


Jib Leads
First you remove all the old hardware and salvage what you can, typically just the two cleats and fasteners as the tracks and hardware are old and the ratchet blocks are too large for this use (but can be repurposed as a second ratchet for the main sheet for example). The big problem with retrofitting a boat of this vintage (of any manufacturer not just Perssons) is the deck insets for the skipper controls are really not large enough to accommodate the control line cleats, turning block and jib cleat without sticking into the cockpit. In an ideal world, you’d cut the deck out and replace it with a larger inset that is similar to the Starmarine boats (the “2nd gen” Perssons) or DBs. In fact Andrew at Jibe Tech does this for his older boats and it’s so well done you can’t tel it’s a retrofit. My prior 30299 Jibe Tech had this done and it was virtually indistinguishable from my current boat 31313 (almost 15 years newer!). It would be nice to have a small set of molds to make an updated deck inset section for first gen Perssons but that’s way beyond my skill set and I can’t find anyone interested in doing it (or the replacement work).


The trick is figuring out how to make it work with the smaller inset. I have found that removing or moving the aft cleat gives just enough room to mount the small 40mm ratchet blocks made by Ronstan (auto and manual on/off) or Harken (manual on/off) and the cleat as shown in the last picture of the DB. It’s still a little crowded but it works. I use the same Harken track and leads that come on new boats: 16mm Pinstop Car — Eyestrap ($92 ea) and 16mm Low-Beam Pinstop Track — .3 m ($40 ea) which along with the 40 mm ratchet blocks (~$85 ea) bring this upgrade to about $500, a worthwhile investment.
The other aspect is mounting the floating lead control line. The trick with leading this is to make a “triangle” between the car and the two ends of the lead so when you move the car it doesn’t substantially tighten/loosen the lead. I also fit a through deck fitting inside the car eye strap on the car so the lead runs cleanly through and does not bind on the eyestrap. Also, it’s important to get the track and car back as far as possible because of the current trend of elevating the jib an inch or so more off the deck that in the past, which has the effect of needing the lead farther aft. Note the multi-angle wedges on the double turning block (lead and mast aft) so they run well.


Because this boat is cosmetically ugly, I didn’t spend any time filling the old jib track holes. The only ones I filled were any unused holes into core or plywood to prevent water intrusion.
Other Modifications
I removed the chainplates and drilled another hole in front of the forward bolt using my drill press so it lines up with the forward hole for the stamaster. Without the third bolt, the chainplate lifts up and causes the head on the forward bolt to fail, something I’ve seen happen several times with catastrophic consequences, usually a badly bent or broken mast. While I was at it, I replaced all the bolts just to be safe. This boat has a backing plate under both of the stock bolts which I had to trim a hair so I could get a good sized washer under the nut on the new forward bolt. I also added reaching hooks that are just on the cotter pins, but I’m not sure how well this is going to work.

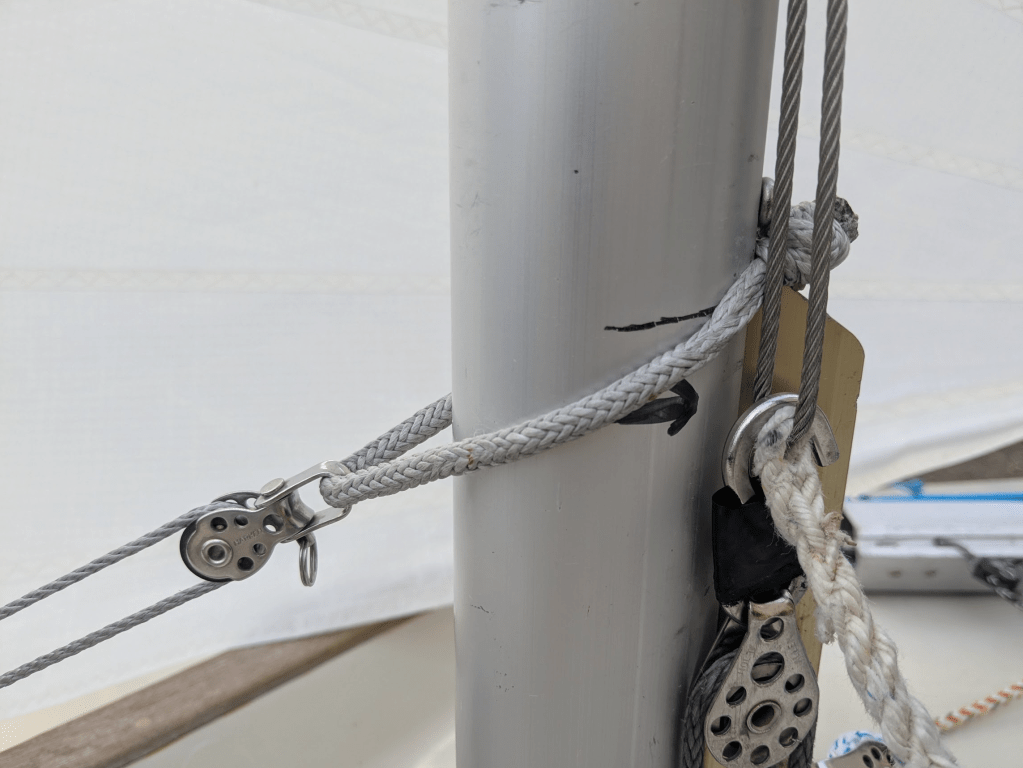
I added a small chainplate to the stem fitting. This accomplishes two thing, 1. gets the jib up (typically we used a shackle) and 2. gets the forestay out of the way and you can adjust it to determine how far back the mast can go in the partners. In this setting, the mast gets to within about 1/4″ of the back of the mast partner, plenty far back for lighter air downwind, and can be shortened for heavier air. I never thought this was legal because my understanding of the rule was the forestay and jib luff wire had to “be on separate pins”, but that’s not the way the rule reads. It says that you need to be able to remove one without removing the other, which this setup allows. I also replaced the jib cunningham with 2mm dyneema which runs really easily and is plenty strong. I replaced the wire cunningham on my Jibe Tech with this because it goes through the tube under the foredeck easily.

I replaced the vang blocks and line (the 16:1 setup was ok) and it all runs smoothly. The cascades are all 7/64″ dyneema and the rest is Nexus pro 6mm which is supple, runs well and nice on the hands. I have it on my Jibe Tech and it’s easy to end-end splice with a dyneema core for a continuous line (I didn’t end-end splice it here).


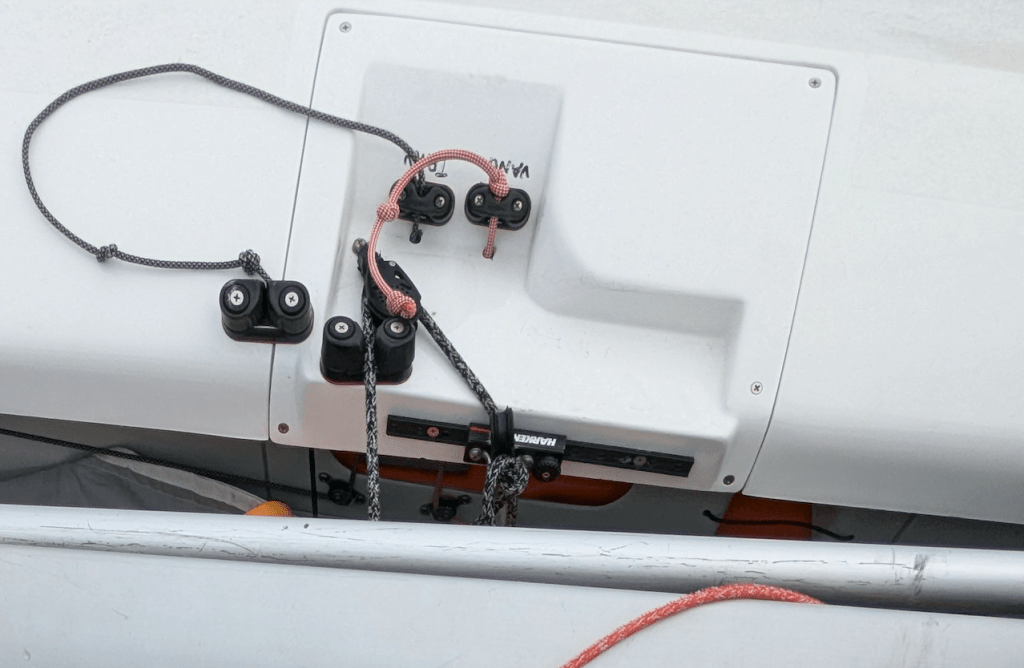
The crew control line panel has only “one tier” where the newer boats have two tiers for cleats (many new boats have more lines run to the crew). But you can nest them well with one tier. The cleat with the red line is reused from the skipper inset. I purchased the Harken x-treme angle fairlead for the vang cleat because the crew will be trimming this at odd angles. I reused the cleat that was there, but the hole pattern is not exactly the same as the new cleats (shocker!) but close enough to work fine, it just looks off. I had to enlarge the old hole in the deck so the vang doesn’t rub at angle, but that’s hidden by the fairlead thankfully because it’s really big. The hiking strap on the right (yellow) used to be where the vang was, but I moved it to the bulkhead with a captured jam cleat.

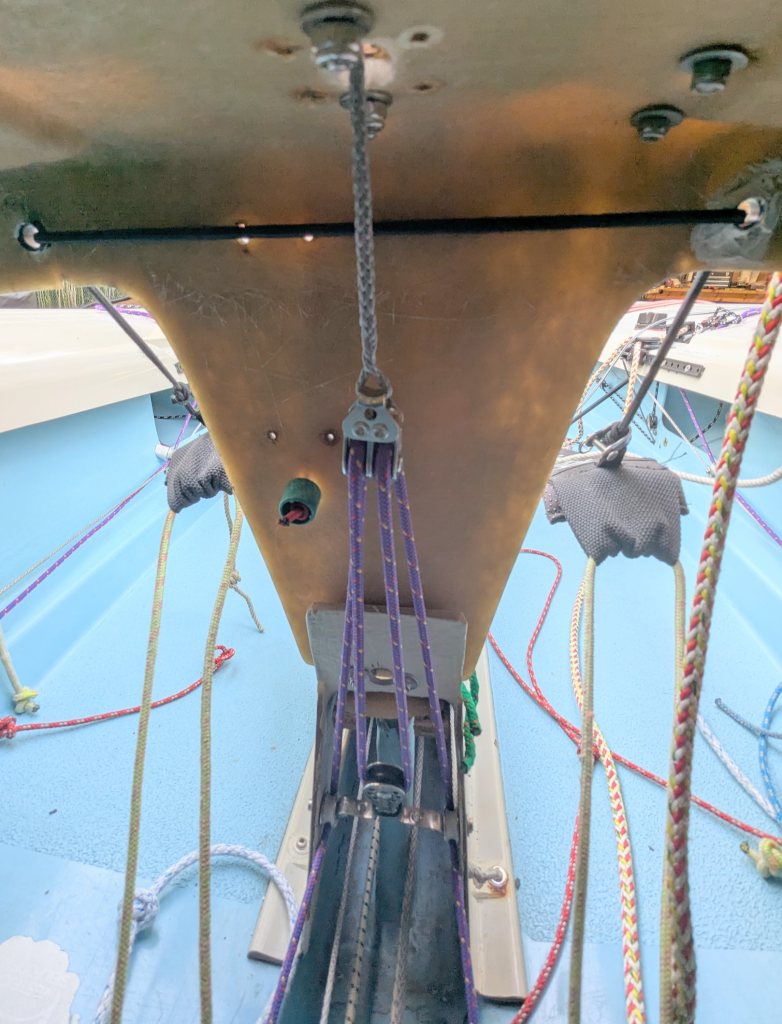
After a lot of trial and error moving the turning blocks under the deck (with my body painfully shoved under the deck) all of the control lines at the base of the mast run smoothly and don’t interfere. The vang (white) and the jib leads (blue/gray) cross under the deck to control things on the other side of the boat. For the vang this is important when the main is out so the purchase doesn’t rub badly against the mast web and create a ton of friction.


To get the jib halyard control back to the original skipper location, I had to flip the 4:1 purchase in the trunk (a real knuckle skinning task) and replace the control line because it was not long enough. Also, the mainsheet block had a swivel bail with a cleat on it, typical of many one designs, but doesn’t work well in the Snipe as the mainsheet stays cleated (and makes you lazy!), so I removed it and mounted the block right to the trunk. Usually, the mainsheets cleats are on the deck, but just went sans cleats to keep it simple and prevent you from being lazy. Note the plastic covering on the front of the ratchet block. I always make these (you have drill out rivets in the blocks and use bolts to hold it on) and they really keep lines from getting sucked into the block. That never ends well.

And lastly I rebedded all the cleats that were screwed into plywood backing with silicone to make them water tight and I cleaned and lubed all of the harken cleats with silicone spray. It works great as a cleaner and leaves a nice dry lubricant.
I did a bearing job on the trailer as well as replaced the bunks with those from an old trailer that came with the boat (and sold on FB marketplace) so it’s ready to go.


The daggarboard is not anodized so I wet sanded it and polished it well to prevent it from oxidizing, for a short time anyway. I gave the mast and boom a full inspection and other than replacing the gooseneck with a square male fitting that fits the original Proctor boom (the Sidewinder goosenecks are round because their booms have round female fittings), and a few little tweaks, those are in good shape. The last major task – really a regular maintenance task – was to to buff the chalk from the bottom and apply at least several coats of marine polish to seal up the gelcoat. Once the gelcoat gets old, you have to keep on it to prevent oxidation. I still need to do a final weighing of the boat at SSA, but I suspect it is several pounds lighter and that’s good because last time I weighed it a few years ago, it came in at 386.
Final Thoughts
It must be said that doing refits on these boats is a labor of love; you will never recoup the value of your time. But isn’t that the case with any boat? This refit was a total of about a week of my time which being retired is “free” and I enjoy it and have a decent garage space to do it. If I were better at it, I would fair the bottom and spray a new layer of gelcoat, fill the holes in the deck try and match the colors. But that would add at least a week’s worth of work that’s not my forte (I’d probably just make it uglier in the end), and since it’s really is just cosmetic I’m not going to bother. But someone with the skills, equipment and a suitable shop could easily do it and would really make Ugly Betty shine.
Assuming these boats don’t gain weight (not a great assumption given the balsa core) they are still very competitive if brought up to contemporary standards. The Persson Snipe has a good pedigree (40 of the 52 boats at the 1997 Worlds were Danish Perssons) and has a contemporary hull shape and as a result these boats if brought up to contemporary standards could win a national championship in the right hands. I have about $4000 in the boat and that’s a great value for its competitiveness. It will no doubt needs some additional glass work at some point, but that can be addressed later.

Hello, thanks for posting this – really useful information. Was wondering if you have any thoughts on whether it would be worth doing something similar to an old Lofland snipe?
thanks
Hi, thanks for the comment. This is a variation on a question I see often in the Snipe Sailing Facebook group. My answer to your question is: It depends on what your goals are. Before I answer, if you are not familiar with the history of the class, some substantial changes were made in the earl 1970s that essentially obsoleted prior built boats. Most notably lowering the minimum hull weight from 425 (or more) pounds to 381 pounds to modernize and make the boat easier to handle. This substantial decrease was made possible by construction innovations and materials, transitioning from traditional thick wooden planks to lighter construction methods and fiberglass hulls. An old Loftland Snipe is likely an early fiberglass or fiberglass over wood and at this higher weight. So if you want to try and make it competitive with modern Snipes, it would take significant work to get it down to the modern weight and rigging, which would probably cost you as much as buying a new one, that is if it were even possible. That said, if you just want to have a nice day sailing boat, making a few upgrades to make things work better would be worth your time and money, but realize any money you put into an old Snipe like this would just be for your enjoyment and you would likely never get that money back if you were to sell it. But ultimately, the changes I made to these older Perssons are not really a model for what to do for these older non-competitive boats. I hope this helps!
Thanks for the reply
For context, I would want if for club racing. I’m in Europe at a small club where snipes are sailed but it’s not a common boat here and there is almost no second hand market. There are a few modern boats about but mostly Mk1 skippers from the 80s.
The lofland boat in question is all fibreglass, but I was surprised how light it is as compared to some of the old Skippers hence my interest. Love the 60’s seafoam green too!
I would be worried about the boat weight which has a large effect on speed. But if it is close to minimum weight (or at least comparable with competitors) and the mast is relatively modern (not deck stepped) it might work for local racing.
Nice write-up. Do you have any opinions on whether this is worth doing to much older boats? I may be able to get my hands on a Lofland Snipe and I’m curious how well it would perform if the rigging as brough up to scratch. I know it was winning races locally 10+ years ago and the hull is still surprising light.
oops sorry for double post